How to change a plug on a lamp? To change a plug on a lamp, unplug it first. Cut off the old plug, strip the cable ends, and connect the live and neutral wires to the new plug terminals. Tighten the screws, secure the cable grip, and close the plug. Test the lamp to ensure it works safely.
Is your lamp’s plug damaged or not working properly? Changing it might sound tricky, but it’s easier than you think.
By learning how to change a plug on a lamp yourself, you can save money and get your light back in no time. In this guide, you’ll find simple, step-by-step instructions that anyone can follow. Ready to fix your lamp quickly and safely?
Keep reading—you’ll be surprised how simple this task really is.
How to Change a Plug on a Lamp?
Tools And Materials Needed
Essential tools include a screwdriver, wire strippers, and a new plug. Materials needed are electrical tape and replacement plug parts. Safety gloves help protect hands during the process.
Basic Tools
Start with a few simple tools. A screwdriver is a must. Choose one that fits the screws on your lamp plug. Wire cutters or scissors help cut old wires cleanly. A wire stripper removes the plastic coating from the wires. These tools make the job easier and safer.
Replacement Plug
Pick a new plug that matches your lamp’s power needs. Look for a plug with the right voltage and current rating. Most plugs come with instructions. Follow them closely for best results. Having the right plug ensures your lamp works well and safely.
Electrical Tape
Electrical tape is important to cover exposed wires. It helps prevent short circuits and electric shocks. Use good quality tape made for electrical use. Wrap it tightly around wire connections for extra safety.
Safety Gear
Protect yourself during the work. Use gloves to avoid cuts and shocks. Safety glasses shield your eyes from wire bits. These simple items keep you safe during the task.

Credit: www.youtube.com
Safety Precautions
Changing a plug on a lamp is simple but needs care. Safety is key to avoid shocks or damage. Take steps to protect yourself before starting.
Turn Off The Power
Unplug the lamp from the wall socket. Never work on a lamp that is plugged in. This stops any electric current from flowing.
Use The Right Tools
Use tools made for electrical work. Insulated screwdrivers and wire strippers help keep you safe. Avoid using damaged or worn-out tools.
Work In A Dry Area
Make sure your hands and work area are dry. Water and electricity can cause electric shock. Dry surfaces reduce the risk of accidents.
Check The Wires
Inspect the lamp’s wires for damage. Do not use if wires are frayed or broken. Replace wires if needed before changing the plug.
Follow Instructions Carefully
Read the plug’s instructions before starting. Correct wiring is important for safety and function. Connect wires to the right terminals only.
Removing The Old Plug
Start by unplugging the lamp from the socket to stay safe. Use a screwdriver to open the old plug and carefully remove the wires. Gently pull out the plug once the wires are loose.
Unplug The Lamp Safely
First, unplug the lamp from the power socket. This step is crucial for safety. Never work on a lamp that is plugged in. Double-check the plug is fully removed from the wall.
Examine The Old Plug
Look closely at the old plug to see how it is attached. Some plugs have screws, while others snap together. Understanding the plug type helps with removal.
Open The Plug Case
Use a screwdriver to remove screws on the plug case. Keep the screws safe for later use. Gently pull the plug apart to expose the wires inside.
Identify And Loosen The Wires
Inside, find the wires connected to the plug terminals. Usually, there are two or three wires: live, neutral, and sometimes earth. Use the screwdriver to loosen the screws holding the wires.
Remove The Wires From The Plug
Carefully pull the wires free from the terminals. Avoid damaging the wire ends. If wires are twisted or frayed, trim them slightly for a clean end.
Dispose Of The Old Plug Properly
Once removed, put the old plug aside. Do not leave it where it can cause confusion. Dispose of it according to local electronic waste rules.
Wiring The New Plug
Wiring the new plug is a key step in changing a lamp plug safely. It connects the lamp cord to the power source. Careful wiring ensures the lamp works correctly and stays safe to use.
Follow each step slowly. Check your work after each connection. Use tools like a screwdriver and wire stripper for best results.
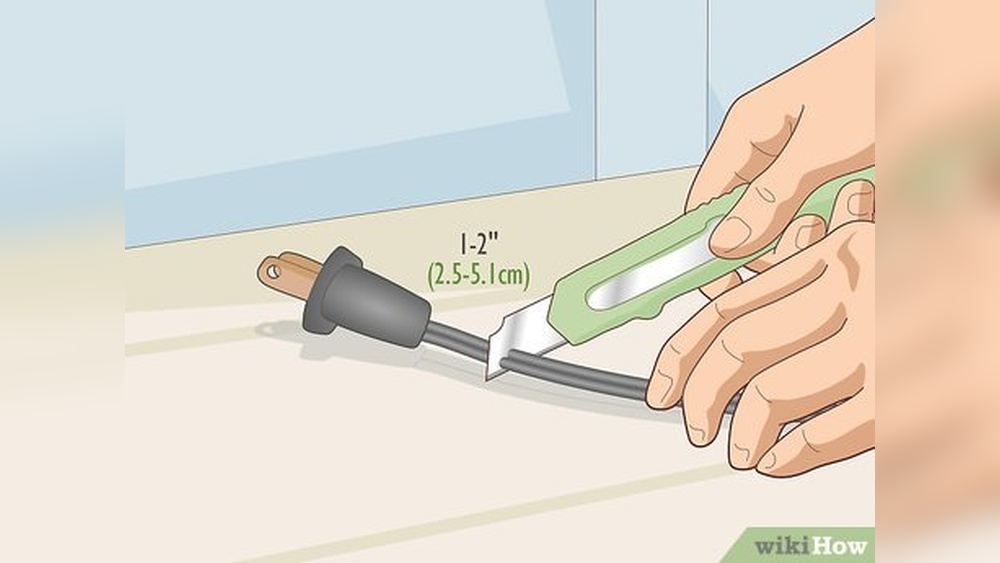
Prepare The Lamp Cord
First, remove about one inch of the outer cover of the lamp cord. Use a wire stripper or sharp knife. Be careful not to cut the inner wires. Inside, you will see two or three wires, usually colored.
Identify The Wires
Look closely at the wires inside. The live wire is often brown or red. The neutral wire is blue or black. If there is a third wire, it is green or yellow-green, for grounding. Knowing these colors helps connect the plug correctly.
Attach The Wires To The Plug
Open the new plug’s cover. Inside, find three terminals marked L, N, and E or a ground symbol. Connect the live wire to L. Connect the neutral wire to N. Attach the ground wire to E if present. Tighten the screws firmly to hold the wires in place.
Secure The Cable Grip
Most plugs have a cable grip. It holds the lamp cord tightly to stop wires from pulling loose. Place the cord under the grip and tighten the screw. This step keeps the wiring safe and stable.
Close The Plug And Test
Check all wires again. Make sure no bare wire is showing outside the terminals. Close the plug cover and tighten the screws. Test the lamp by plugging it in and switching it on. The lamp should work without sparks or flickering.
Testing The Lamp
Testing the lamp after changing its plug is an important step. It ensures the lamp works safely and correctly. This step helps find any wiring mistakes early. It also confirms the new plug is connected right.
Testing is simple and quick. It requires only a few tools and careful attention. Follow these steps to test your lamp properly.
Visual Inspection Before Testing
Look at the lamp and plug closely. Check for loose wires or damage. Make sure the plug is tightly fixed. Confirm no wires are exposed. This quick check prevents electric shocks and short circuits.
Using A Multimeter For Safety
Set the multimeter to measure voltage or continuity. Touch the probes to the plug’s pins carefully. Check for a continuous connection inside the lamp. This step shows if wires connect correctly. No reading means a wiring problem.
Powering On The Lamp
Plug the lamp into a power outlet. Turn on the lamp switch slowly. Watch the bulb light up clearly. No flickering or dim light means good wiring. If the lamp does not light, check connections again.
Checking For Heat And Smell
Let the lamp run for a few minutes. Feel the plug and lamp base for heat. Smell the plug area to detect any burning odor. Excess heat or bad smell signals a fault. Unplug immediately and inspect the wiring.

Credit: www.youtube.com
:max_bytes(150000):strip_icc()/replace-a-light-socket-1152456-05-c5ea0f0150924f36983ffe580a3f1859.jpg)
Credit: lepaystchad.com
Frequently Asked Questions
How Do I Safely Remove An Old Plug From A Lamp?
Unplug the lamp first. Use a screwdriver to open the plug casing carefully. Disconnect wires gently.
What Tools Do I Need To Change A Lamp Plug?
You need a screwdriver, wire stripper, new plug, and electrical tape. Keep them close for easy work.
Can I Use Any Plug For My Lamp Replacement?
Use a plug that matches your lamp’s voltage and current rating. Check local electrical rules too.
Conclusion
Changing a plug on a lamp is simple and safe. Follow each step with care and patience. Use the right tools and check your work twice. This small fix saves money and keeps your lamp working well. Now, you can fix plugs yourself without trouble.
Try it today and feel confident handling small repairs. Safety first, always. Keep your home bright and safe.
Read More
- How to Choose Lamps for Living Room: Brighten Your Space Perfectly
- What Does Lamp Out Mean on a 2005 Dodge Ram: Expert Explanation
- Modern Sleek Floor Lamp for Living Room: Illuminate with Style

