Sometimes a recipe calls for self-raising flour, and you only have plain flour in your pantry. It’s a common kitchen puzzle, especially when you’re just starting to bake. Don’t worry, figuring out How Do I Turn Plain Flour Into Self Raising Flour is easier than you think!
This guide will show you a simple way to make your own self-raising flour so you can bake without any fuss. Let’s get your ingredients ready for delicious results.
Making Self Raising Flour From Plain Flour
Many home bakers wonder How Do I Turn Plain Flour Into Self Raising Flour. It’s a simple switch that can save a trip to the store. Self-raising flour has baking powder mixed into it.
Baking powder is what makes baked goods light and fluffy. When you combine baking powder with plain flour, you create your own version of self-raising flour. This method works well for most recipes that need this type of flour.
You just need the right ratio of ingredients.
What is Self Raising Flour?
Self-raising flour is a type of flour that already has a leavening agent mixed in. This leavening agent is usually baking powder. Baking powder is a chemical leavener.
It reacts with liquid and heat to create carbon dioxide gas. This gas gets trapped in the dough or batter. When the baked good cooks, the gas expands, causing it to rise.
This gives your cakes, scones, and muffins that desirable light and airy texture.
Plain flour, also known as all-purpose flour, does not contain any leavening agents. It’s just milled wheat. To make plain flour act like self-raising flour, you need to add the baking powder yourself.
The amount of baking powder you add is important. Too little, and your baked goods might be dense. Too much, and they might have a chemical taste or rise too quickly and then fall.
The Simple Ratio For Conversion
The key to knowing How Do I Turn Plain Flour Into Self Raising Flour lies in a simple ratio. For every 1 cup (about 120 grams) of plain flour, you will need to add a specific amount of baking powder. This amount is generally about 1.5 to 2 teaspoons of baking powder.
It’s a small amount, but it makes a big difference.
Using 1.5 teaspoons of baking powder per cup of flour is a good starting point. Some bakers prefer to use 2 teaspoons for a little extra lift, especially in recipes like cakes. For most home baking needs, 1.5 teaspoons is perfectly adequate and provides a reliable rise.
Always make sure your baking powder is fresh. Old baking powder loses its potency and won’t give you the best results.
How To Measure Baking Powder Correctly
Measuring baking powder accurately is vital. When you measure, you want to ensure you have the right amount. Spoon the baking powder into your measuring spoon.
Then, level it off with a straight edge, like the back of a knife. Don’t pack it down. This ensures you’re using the correct dose.
Over-measuring can lead to a metallic taste, while under-measuring means less lift.
If you’re using weights, a good rule of thumb is about 5 grams of baking powder per 100 grams of plain flour. This is equivalent to roughly 1.5 teaspoons. Using scales can offer more precision, especially if you’re baking for a large group or want consistent results every time.
Step-By-Step Guide To Making Your Own
Let’s walk through how to actually do it. It’s straightforward and quick.
Step 1 Measure Your Flour
Decide how much self-raising flour you need for your recipe. Measure out the required amount of plain flour. For example, if your recipe needs 2 cups of self-raising flour, measure 2 cups of plain flour.
Step 2 Measure Your Baking Powder
Now, calculate how much baking powder you need. For every cup of plain flour, you need 1.5 teaspoons of baking powder. So, for 2 cups of plain flour, you’ll need 3 teaspoons of baking powder (2 cups * 1.5 teaspoons/cup = 3 teaspoons).
Step 3 Combine The Ingredients
Place your measured plain flour into a mixing bowl. Add the measured baking powder on top of the flour.
Step 4 Whisk Them Together
This is a crucial step. You need to ensure the baking powder is evenly distributed throughout the flour. Use a whisk or a fork to mix the flour and baking powder together thoroughly.
Whisk for at least 30 seconds. You want to see no streaks of baking powder. It should look like one uniform pale powder.
You can also sift the mixture. Sifting helps to aerate the flour and break up any small lumps. It also ensures maximum distribution of the baking powder.
Sift the flour and baking powder together at least once, or twice for extra assurance.
Step 5 Use Immediately Or Store
Once you have combined them well, your homemade self-raising flour is ready to use in your recipe. If you have any leftover, you can store it in an airtight container. Make sure to label it clearly as “Self Raising Flour” and note the date you made it.
It’s best to use it within a month or two for optimal freshness and leavening power.
Tips For Best Results
To get the most out of your homemade self-raising flour, keep these tips in mind.
- Freshness is key. Always check the expiry date on your baking powder. If it’s old, it might not work as well. Test it by putting a teaspoon in a little hot water. If it fizzes vigorously, it’s good to go.
- Thorough mixing is essential. Don’t skip the whisking or sifting. Uneven baking powder distribution can lead to pockets of dense flour or uneven rising in your baked goods.
- Consistency matters. If you bake often, you might want to mix a larger batch and store it. However, for the freshest results, it’s often best to mix only what you need for your current baking project.
- Know your flour. Different types of plain flour can have slightly different protein content. However, the standard ratio generally works well for most common plain flours.
What If My Recipe Calls For Both Flour And Baking Powder?
This is a good question. If a recipe lists plain flour and then separately lists baking powder, it usually means the baking powder is a specific amount needed for the recipe’s texture, beyond what’s in self-raising flour. In this case, you should still use plain flour and the specified amount of baking powder.
You wouldn’t convert plain flour to self-raising flour. You would use the ingredients as listed.
Can I Use Baking Soda Instead Of Baking Powder?
No, you cannot directly substitute baking soda for baking powder when making self-raising flour. Baking soda is a different type of leavener. It’s alkaline and needs an acid ingredient (like buttermilk, lemon juice, or vinegar) in the recipe to activate.
Baking powder contains both an acid and a base, so it’s a complete leavening agent on its own. Using baking soda alone will not give you the desired rise.
If a recipe requires baking soda, it will also include an acidic ingredient. If you were to try and substitute baking soda for baking powder in the self-raising flour conversion, your baked goods would likely taste bitter and not rise properly. Stick to baking powder for this specific conversion.
How Much Self Raising Flour Does This Method Make?
This method effectively converts plain flour into self-raising flour on a cup-for-cup basis. If you need 1 cup of self-raising flour, you will start with 1 cup of plain flour and add 1.5 teaspoons of baking powder. If you need 2 cups, you’ll use 2 cups of plain flour and 3 teaspoons of baking powder.
It’s a direct conversion of volume. The amount you make is exactly the amount you need for your recipe.
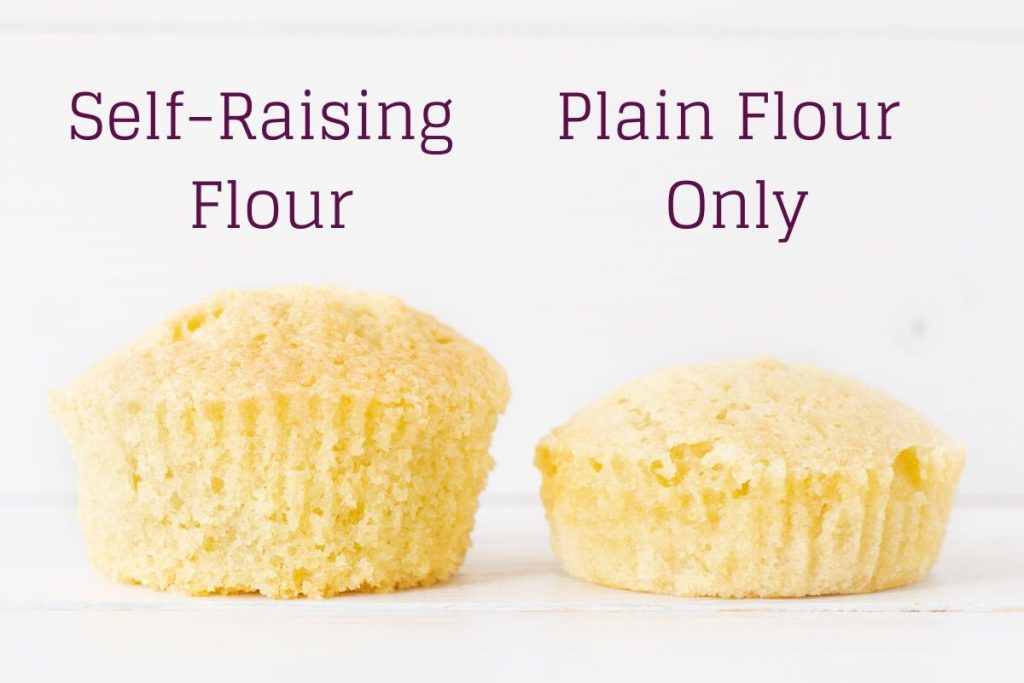
Does It Affect The Texture Or Taste?
When done correctly, this method should not significantly affect the texture or taste of your baked goods. The goal is to replicate the effect of commercial self-raising flour. The key is using the right amount of baking powder and mixing it thoroughly.
If you use too much baking powder, you might notice a slight metallic or bitter taste. If you don’t mix it well, you might have some areas that rise more than others, leading to an uneven texture.
However, with proper measurement and mixing, the results are usually indistinguishable from using pre-made self-raising flour. It’s a reliable and practical solution for home bakers.
Frequently Asked Questions
Question: What is the exact ratio of plain flour to baking powder for conversion?
Answer: For every 1 cup (about 120 grams) of plain flour, add 1.5 teaspoons of baking powder. This is the most common and effective ratio.
Question: Can I use self-raising flour that I made myself in any recipe?
Answer: Yes, the self-made self-raising flour can be used in most recipes that call for store-bought self-raising flour. It’s a direct substitute.
Question: How long does homemade self-raising flour last?
Answer: It’s best to use it immediately. If stored, keep it in an airtight container for up to 1-2 months. Ensure your baking powder is fresh when you make it.
Question: What happens if I use too much baking powder?
Answer: Using too much baking powder can give your baked goods a bitter or metallic taste and may cause them to rise too quickly and then collapse.
Question: Can I just mix baking powder with plain flour and use it right away?
Answer: Yes, you can, but it is highly recommended to whisk or sift the flour and baking powder together thoroughly to ensure even distribution for consistent results.
Final Thoughts
Knowing How Do I Turn Plain Flour Into Self Raising Flour is a handy baking skill. You simply add baking powder to plain flour using a 1.5 teaspoon per cup ratio. Whisk or sift them well.
This gives you a reliable self-raising flour for all your baking needs. You can bake delicious cakes, scones, and more with confidence, even if you don’t have the specific flour on hand.
