How to replace 3 way lamp socket? Turn off power, remove the lampshade and bulb, lift the socket shell, disconnect the wires, note their placement, attach wires to the new 3-way socket (hot to brass, neutral to silver), tighten screws, reassemble the socket, and test with a 3-way bulb.
Is your 3 way lamp socket flickering or completely dead? You don’t have to buy a new lamp or call an expensive electrician.
Replacing a 3 way lamp socket is easier than you think, and you can do it yourself with just a few simple tools. In this guide, you’ll learn step-by-step how to safely and quickly replace your lamp socket, saving money and getting your lamp working like new.
Keep reading, and by the end, you’ll feel confident tackling this common home repair on your own.
How to Replace 3 Way Lamp Socket?

Credit: www.youtube.com
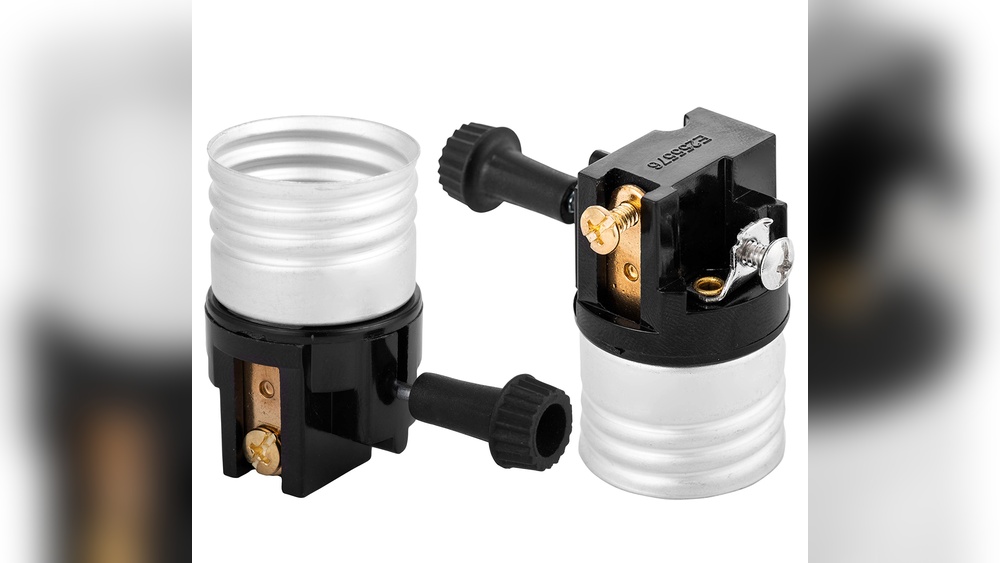
Tools And Materials Needed
Replacing a 3-way lamp socket requires the right tools and materials. Using proper equipment makes the job safer and easier. Gather all items before starting the repair. This saves time and avoids interruptions.
Tools Needed
Start with basic tools that help remove the lamp socket. A screwdriver is essential to unscrew parts. Use a flathead or Phillips type, depending on the screws. Needle-nose pliers help to grip wires firmly. Wire strippers are needed to prepare the wires for connection. A voltage tester ensures the power is off before working. Having a utility knife can help strip insulation if needed. A small flashlight can illuminate tight spaces for better visibility.
Materials Needed
Choose the correct replacement 3-way lamp socket that fits your lamp model. New wiring may be needed if old wires are damaged. Electrical tape helps secure wire connections safely. Wire nuts are useful for joining wires neatly. A replacement bulb is necessary after fixing the socket. Use bulbs that match the lamp’s wattage and type to avoid damage.
Turning Off Power Safely
Turning off the power safely is the first and most important step before replacing a 3 way lamp socket. Electricity can be dangerous. Always take precautions to avoid shocks or accidents.
Power must be completely off to work on the lamp socket safely. Even a small electric current can cause injury. Follow these steps to ensure your safety.
Locate The Correct Circuit Breaker
Find the circuit breaker that controls the lamp socket. Usually, your home’s electrical panel has labeled switches. Turn off the breaker that powers the room or area with the lamp.
Test The Power Is Off
Use a voltage tester or a simple lamp to check the socket. Plug in the tester or lamp and see if it turns on. No light or reading means the power is off.
Unplug The Lamp From The Outlet
Always unplug the lamp before working on the socket. This step stops any power from flowing through the lamp’s cord. It adds an extra layer of safety.
Double Check Before Starting Work
Even after turning off the breaker, double check the socket for electricity. Use your tester one more time. Better safe than sorry.
Removing The Old Socket
Removing the old 3-way lamp socket is the first step in the replacement process. This task requires care to avoid damage to the lamp or wiring. Safety is important. Always unplug the lamp before starting.
Take your time to understand the socket’s setup. The old socket might be secured with screws or clips. Knowing this helps you remove it smoothly and safely.
Unplug The Lamp And Clear The Area
Always unplug the lamp from the power outlet first. This prevents electric shocks. Clear the workspace to have enough room for tools and parts.
Remove The Lamp Shade And Bulbs
Take off the lamp shade carefully. Unscrew any bulbs from the socket. This gives clear access to the socket for removal.
Unscrew The Old Socket
Use a screwdriver to remove screws holding the socket. Keep the screws safe for later use. If the socket is clipped, gently release the clips.
Disconnect The Wires
Look closely at the wires connected to the socket. Note their positions or take a photo for reference. Use a screwdriver to loosen wire terminals. Carefully pull the wires free without damage.

Credit: www.amazon.com
Wiring The New 3 Way Socket
Wiring the new 3 way socket is a key step in replacing your lamp socket. It ensures the lamp works correctly at three brightness levels. This process involves connecting wires carefully to avoid shorts or malfunctions.
Understanding the wiring setup helps keep the lamp safe and functional. Take your time to identify each wire and connect it properly. Use the right tools and follow safety steps before starting the work.
Identify The Wires On The Old Socket
Begin by noting the wires attached to the old socket. Usually, there are three wires: common, low, and high. Label each wire to avoid confusion during installation.
Connect The Common Wire
The common wire is usually darker or marked. Attach this wire to the corresponding terminal on the new socket. This connection is crucial for the lamp to function properly.
Attach The Low And High Wires
Connect the low and high wires to their matching terminals. These wires control the different brightness levels of the lamp. Make sure each wire is secure and not loose.
Secure The Connections And Test
After wiring, check all connections for tightness. Loose wires can cause flickering or no light at all. Test the lamp by switching through the three brightness settings to confirm the wiring is correct.
Testing And Reassembling The Lamp
Testing and reassembling the lamp is the final step after replacing the 3 way lamp socket. This process ensures the lamp works properly and is safe to use. Careful testing prevents future problems and saves time.
Reassembling the lamp requires attention to detail. Properly putting parts back together keeps the lamp stable and functional. Follow each step carefully for best results.
Testing The New Socket
First, plug the lamp into a power source. Turn the lamp on using the switch. Check all three brightness settings. Each setting should light up correctly. If the lamp does not work, check the wiring again. Make sure connections are tight and correct.
Securing All Components
After testing, turn off and unplug the lamp. Tighten the socket and any screws holding it in place. Make sure the socket does not move. Secure the lamp harp or shade holder next. This keeps the shade stable and safe.
Reattaching The Lamp Shade
Place the lamp shade back onto the harp. Align it so the shade sits evenly. Tighten the finial or screw that holds the shade. This prevents the shade from wobbling or falling.
Final Safety Check
Look over the lamp for loose parts. Ensure no wires are exposed. Test the switch again to confirm it works. The lamp should feel steady and safe to touch. Now, your lamp is ready to use.

Credit: swietylukasz.radom.pl
Frequently Asked Questions
How Do I Safely Remove A 3 Way Lamp Socket?
Turn off power and unplug the lamp. Unscrew the socket shell carefully to avoid damage.
What Tools Are Needed To Replace A 3 Way Lamp Socket?
You need a screwdriver, wire stripper, and new 3 way socket for the replacement.
How Do I Connect Wires To A New 3 Way Lamp Socket?
Match wire colors to terminals. Tighten screws firmly for a secure connection.
Conclusion
Replacing a 3 way lamp socket is simple and safe. Follow each step carefully and take your time. Double-check your work before plugging the lamp back in. This helps avoid mistakes and keeps you safe. A working lamp brightens any room and lasts longer.
Now you can fix your lamp yourself without waiting for help. Keep these tips handy for future repairs. You did a great job learning this new skill.

